
Day 4
Measuring Urine Output is very important in CNA Clinical Skills. There are different ways to do it, and you need to know how to measure your client’s urine output. One of the most specific things that a CNA can take care of is measuring urine output. Not only can this be done by hand, but there are also computerized urine measurement devices. This will teach you how.
Measuring Urine - 1
One of the most important signs that a patient is improving or responding well to treatment is urine output. Urine output is also a good indicator of the amount of fluid being provided to your patient. Urine output can also be helpful in calculating fluid rates, managing fluid losses and monitoring fluid deficits.
Measuring Urine - 2
While bladder catheters in Adult patients are not uncommon, they are generally regarded as inconvenient and uncomfortable. As CNAs, we often have to use these devices to determine urine output. This is an important measurement when determining if a patient is receiving the proper amount of fluid or if the fluid has been given too rapidly. There are other means of obtaining urine output but many nurses and CNA’s still use bladder catheters as a primary method.
Measuring Urine - 3
Measuring urine output is an essential part of CNA clinical skills. One of the most important factors for measuring urinary output is using an accurate and credible method for measuring how much urine has been passed.
The CNA is asked to empty the resident’s urinary drainage bag into a graduate container and to measure the amount of urine. An Intake and Output (I&O) Form (see sample on website) is provided to record the measurement. The output should be recorded as urine and the correct time recorded for the measurement. The role of the resident is played by either a person or mannequin.
Set graduate on flat surface protected with barrier to read, obtaining measurement by reading graduate at eye level, and if urine poured into graduate from a bedpan, complete task over toilet pouring the full amount of urine into the graduate?
Leave bag hanging from bed frame (not side rail), and drainage bag and tubing off (not touching) the floor?
Keep urinary drainage bag positioned lower than bladder throughout care?
Liquids Input / Output Form
Notice on the SECOND GROUP – Urine OUTPUT –

The RECORDING SKILLS ARE:
1. Measure Urine Out-Put / 2. Feeding a Patient / 3. Pulse / 4. Respiration
Remember, if you are measuring something it MUST be written in the record.
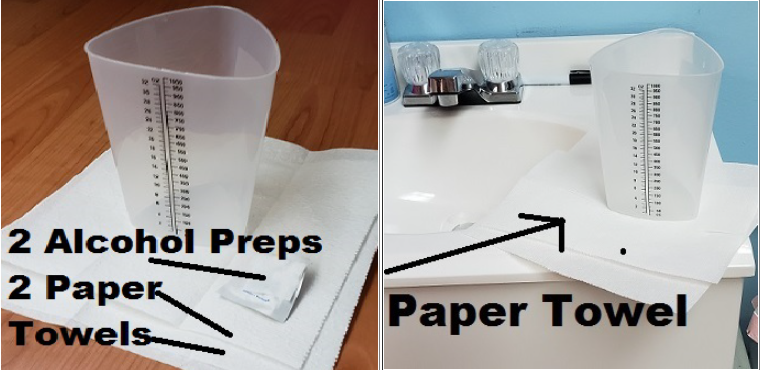
ALWAYS place 2 paper towels under the Urine Measuring Cup
Check to make sure the TUBE is NOT kinked up… un kink it so the liquid can flow and not back up.
After you DRAIN the bag… just place the Measuring Cup with urine in it on a piece of paper – on the side of the sink… —–or —- pull the toilet seat down and place it there…. if there is no room on the side of the sink. NEVER on the over the bed table!
READ IT at EYE LEVEL… make mental note of number of .cc the larger number NOT the smaller number of ounces.
Be CAREFUL.. DO NOT touch the side of the measuring cup with the tip of the urine bag tube.
Record the amount of urine AFTER your FINAL HAND WASH on the way out of the room …
Urine MUST BE RECORDED in #### .cc at the END of this Skill…
Notice it is normally a pretty full cup.
Equipment Needed:
2 pair of gloves
Paper towels as needed
Measuring cup (Bottom Drawer)
Alcohol swab (Top Drawer)
DO NOT RAISE THE Urine Bag HIGHER than the BLADDER or allow it to fall on sway on the floor. The Bag is always placed on the un-movable CENTER section of the bed.
DO NOT PLACE Urine Measuring cup
On the Over the Bed Table!
Measure Urine Out Put – RECORD When Done
The bed will be raised up so that it is up high enough that the tub is slightly above the Urine Measuring Cup.
Do NOT raise the Head of the Bed !
Notes:
1. Do not raise Catheter bag higher than bladder.
2. The Catheter bad hangs on the CENTER unmovable section of bed.
3. Do not DRAG catheter bag on the floor or lower bed too low.
4. Do not touch the tub onto the sides of the urine cup as you drain it.
5. Un-tangle the tub on the side of the bed.
6. Raise the bed high to drain – don’t forget to lower bed.
7. U T I – Urinary Track Infection
8. The Urine Measurement is recorded as OUTPUT and in the math statement of .cc THE LARGER NUMBER. —->>>> 1 Oz = 30. cc – Just read the LARGER NUMBER to the Right.
PROCEDURE:
1) Opening procedure – Gloves required
2) Raise the bed so the Foley (catheter/foley/urine) bag is in a position where it will not spill urine past the cup.
3) Place paper towels on the floor and the measuring cup and alcohol swab on top, directly under the spout of the Foley bag. Open the alcohol swab and set it on the paper towel.
4) Open the spout to the Foley bag and drain urine into the measuring cup.
DO NOT TOUCH THE TUBE OR LET THE TUBE TOUCH THE CUP!
5) Lock the tube before you clean it. Use the alcohol swab to clean the end of the tube.
6) Return tube to the storage pouch on the Foley bag.
7) Place the measuring cup on paper towels on the SINK
DO NOT PUT IT ANYWHERE ELSE! DO NOT PLACE CUP ON OVER THE BED TABLE YOU WILL FAIL!
8) Remove your gloves, wash your hands and put on new gloves.
9) Closing procedure. Reset patient – give call light / lower the bed / DO not let Urine bag touch floor.
10) READ Urine measurement at eye level. Do not hold up in the air. Measure the urine in .cc, remember the number of .cc on Measuring Cup. Use standard equipment clean up – Rinse twice with water and pour urine and rinse water into toilet. Spray disinfect – paper towel dry and return to storage.
11) Remove your gloves / Mental Check
12) Wash your hands
13) Record the output in cc. the larger number on form.
14) I am done.