
Day 2
AMBULATION WALKING
Ambulation is the act of moving around. In rehabilitation, it refers to a patient’s ability to perform such tasks with motorized or non-motorized walking aids. At present, there are two international standards for patients undergoing ambulation training for use as a clinical outcome measure. These are one for elderly fallers and one for stroke patients. The goal of ambulation training is to develop the ability to walk in all environments with an assistive device which can be either a walker or cane if not able to do so independently.
Standing Ambulation Walking
Standing ambulatory walking (SAW) is a practical form of ambulation that meets the unique needs of the individuals who cannot walk unassisted, but who have strength and endurance to stand up once per week. Standing ambulatory walking is equally beneficial for those with significant loss of function in the lower limbs or for those at risk for future lower limb amputation due to conditions similar to Charcot Foot.
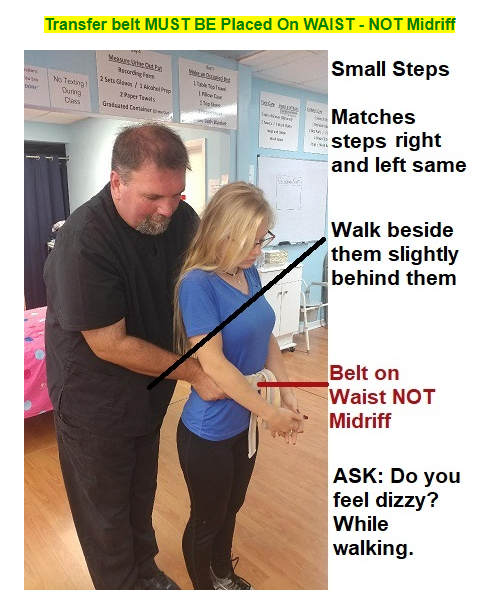
The CNA is asked to walk a resident who needs some assistance to stand. A transfer/gait belt is used while walking the resident. The role of the resident is played by a person.
Must walk a least 10 full steps, includes both feet = 1 step.
Backs of legs MUST BE touching chair before you sit them.
You must always walk on the weak side to support your patient as it is that side to which they will fall due to their weakness.
REMEMBER to hold the transfer belt and bend you knees as you assist them to sit.
Backs of legs MUST BE touching chair before you sit them.
Remove the transfer belt and ensure the comfort of the resident.
Exit Procedure.
Orthostatic Hypotension – Change in Blood-pressure- A decrease in systolic blood pressure of 20 mm Hg or a decrease in diastolic blood pressure of 10 mm Hg within three minutes of standing when compared with blood pressure from the sitting or supine position.
Most Important Check Points
No Gloves – Transfer/Gait Belt
Opening Procedure
Bring Transfer/ Belt to patient
Ask Patient to scoot back sit of straight
Explain what a Transfer Belt
Place Transfer Gait Belt On – Buckle on front center Snug
Bring their legs together
Place your feet on the outer side of their feet
Have patent place their arms on your shoulder
You place your hands on the Transfer/Gait Belt Thumbs inside belt.
On Count of 3 we will rock 3 times and stand.
ASK: Do You Feel Dizzy?
CHECK HERE: to make sure Belt is still snug / Adjust
Walk 3 steps backward (CNA/Forward) for Patient to clear chair.
C N A Slowly moves to back of patient. Ending both forward with CNA Slight behind to the side.
You must walk 12 steps total… 6 FORWARD / 6 BACK- Must MATCH their walking Steps
Pausing at the 6 step, ASKING: ASK: Do You Feel Dizzy or Nauseas? YOU MUST ASK TWICE – Once forward then after the turn around going back to chair.
As demonstrated during class.
Backs of legs MUST BE touching chair before you sit them.
Be sure to ask them to sit up straight after you sit them back into the chair.
Remove the Transfer belt
Closing Procedure
I AM DONE